HDR High Dynamic Range
EXTREME EXAMPLES

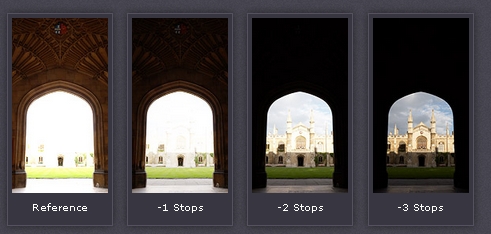
In photography, dynamic range is the difference between the lightest light and darkest dark which can be seen in a photo. Once your subject exceeds the camera's dynamic range, the highlights wash out to white, or the darks become black blobs.
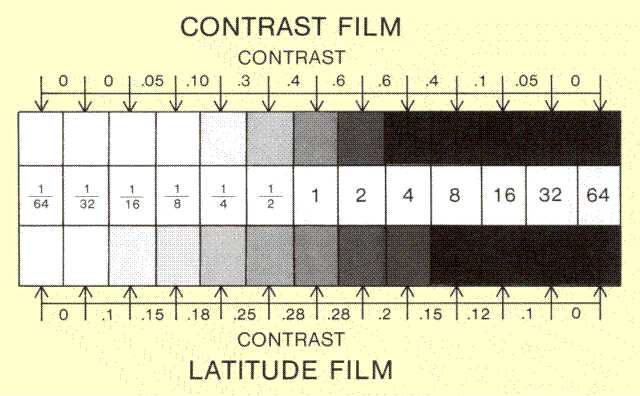
Inkjet print values go from the paper white to the maximum black ink the printer can lay down
Silver (Darkroom) print values range from paper white to what is called maximum density- solid black.
Computer screen values are dependent on how bright the monitor screen can go.
Projectors are limited by how bright the bulb is.


>The dynamic range of a camera is different at different ISO levels. As you increase the ISO level of your camera, the dynamic range actually decreases. This is partially a function of the increased noise at higher ISOs mentioned above.
>The type of file also makes a difference. A Raw file will generally have a larger dynamic range than a JPEG.
>The dynamic range is also affected by different camera settings. For example, many cameras have a dynamic range expansion feature (Canon calls this Auto Lighting Optimizer and Nikon calls theirs Active D-Lighting), which will improve the dynamic range slightly when enabled. In-camera sharpening will also decrease the dynamic range of the picture.

Chart of Camera Dynamic Ranges

A simple way to have a digital camera shoot a higher dynamic range is to set it to capture a lower contrast image. It is brought up to normal contrast, extending the dynamic range, by processing in the computer.


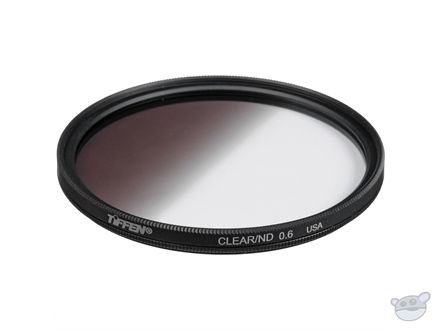
Another simple way to control a scene with too much dynamic range or contrast is a graduated filter over the lens.
It allows normal exposure through the clear area and darkens the filteres area.

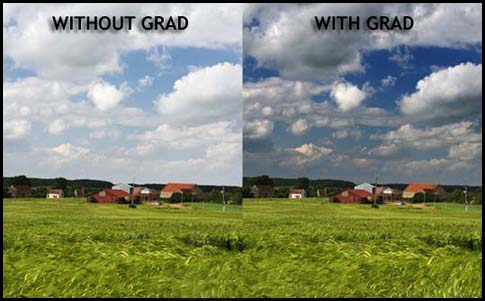
These filters are designed to rotate to match the scene
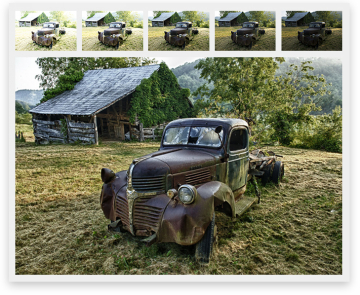
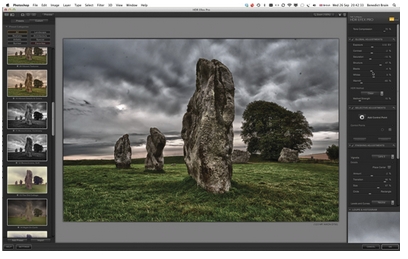


Nikon Tutorial for HDR

Digital HDR - two steps - SHOOTING and PROCESSING

Capturing images with extreme lighting using HDR.
The scene should have areas of light and dark that are too far apart to capture in one shot.
Easy test- If you expose for the shadows and the highlights are "Blown out" you can use HDR


Shoot in RAW (+jpg)

Set White balance for the scene (Not Auto)
Set focus to Manual (Not Auto)
Turn image stabilization off
Set ISO to lowest number
Use a sturdy tripod
Compose your image and lick the tripod in position.
Bracket your shots with exposure for the highlights and for the shadows in 3 or more exposures.
Start with the average exposure your camera recommends.
Bracket this exposure with shots that are over and under by one, two,or even three stops.
Depending on the range of light in your scene you may need to shoot more extreme brackets.

The goal is to capture at least three images - One that has the shadows exposed correctly, one with the highlights exposed correctly and one in the middle.

The next steps happen in the computer.

Photoshop Help - HDR

Video help

how-to-shoot-and-process-high-dynamic-range-images/
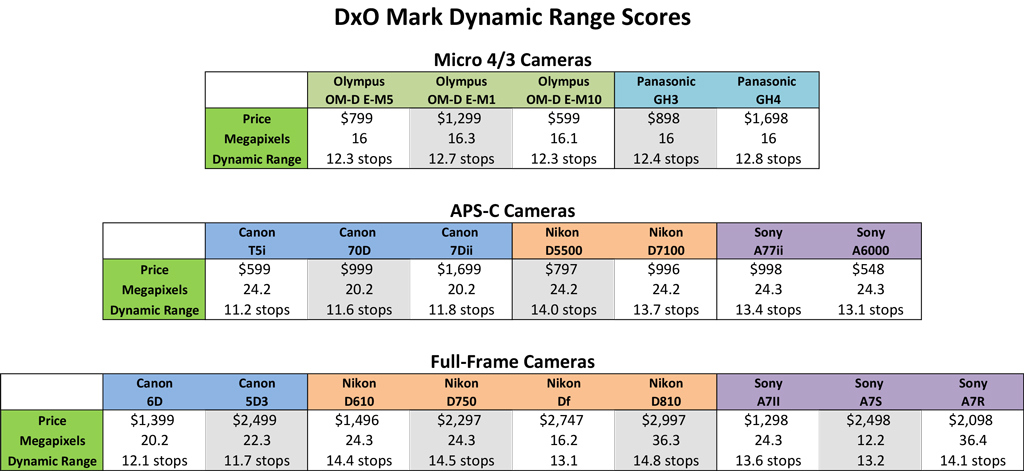
HDR Tutorial

What’s the difference between Latitude and Dynamic Range?