By Julie Adair King
If none of the preset white balance options on your Canon Rebel T3 or T3i produces the right amount of color correction, you can create a custom white balance setting. To use this technique, you need a piece of card stock that’s either neutral gray or absolute white — not eggshell white, sand white, or any other close-but-not-perfect white.
Position the reference card so that it receives the same lighting you’ll use for your photo. Then follow these steps:
1) Set
the camera to the P, Tv, Av, M, or A-DEP exposure mode.
You can’t create a custom setting in any of the fully
automatic modes. (You can, however, select the custom setting you create
when you record movies.)
2) Set the White Balance setting to Auto (AWB).
3) Set the camera to manual focusing.
4) Frame
the shot so that your reference white card fills the viewfinder.
Make sure that at least the center autofocus point and
the six surrounding points fall over the reference card.
5)Take
the picture of your reference card.
The camera will use this picture to establish your custom
White Balance setting.
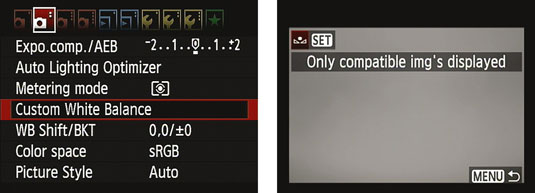
6) Display Shooting Menu 2 and highlight Custom White Balance.

7) Press
Set.
The image you just captured should appear in the display,
along with a message that tells you that the camera will only display
that image and others that are compatible with the custom white-balancing
option. If your picture doesn’t appear on the screen, press the right
or left cross key to scroll to it.
8) Press
Set to select the displayed image as the source for your custom white
balance reference.

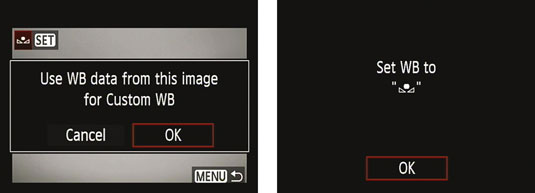
9)
Press the right or left cross key to highlight OK and then press Set.
The message tells you that the White Balance setting is
now stored. The little icon in the message area represents the custom
setting.
10) Press Set one more time to finalize the custom setting.
Your custom
White Balance setting remains stored until the next time you work your
way through these steps. Anytime you’re shooting in the same lighting
conditions and want to apply the same white balance correction, just press
the WB button (top cross key) or use the Quick Control screen to access
the White Balance settings and then select the Custom option.