Off Camera Flash Exercise:
Goal: to explore creative opportunities of using portable flash off your camera
The studio lighting you can hold in your hand.
 |
|
With
the flash off your camera, you have the creative control of having the
equivalent of a studio light and the ability to stop motion in your
hand (or on a stand).
Taking the flash off the camera gives you the advantage of having a
powerful portable light that you can creatively position for the best
light, almost anywhere.
Flash also has the advantage of being a very fast exposure, helping
to eliminate camera or subject movement.
|
Photographs are made stronger
with great lighting.
When out of the studio, you should look for good directional ambient light -
or available light.
Additional lighting can be added to the scene by bouncing the light off a reflector,
using continuous incandescent- fluorescent or led light.
Electronic flash on the camera allows you to provide additional fill or main
light but limits your ability to direct the light.
Off Camera Electronic flash gives you the most control - like carrying a portable
studio.
The biggest disadvantage
of using portable flash in the field is the inability to preview how your lighting
will look without taking a photograph and examining it in camera.

Synchronization
The flash is an extremely
short burst of light. It has to be timed or synchronized with the camera shutter
to make an exposure:
With the flash on the camera the electrical connections tell the flash when
to light.
Off the camera syncronization:
1) A simple way to use flash is like using early flash powder... open
the shutter on bulb or time exposure and manually trigger the flash.
2) Slave trigger - use thf flash on your camera to trigger the external
flash
3) Cable connection - use a hotshoe extension cable or a "pc"
connector cord
4) Wireless trigger- transmitter on the camera, receivers on the flash(s)

Position: Placement of the light determines the light quality
of the photograph
1) in your hand
2) in an assistant's hand
3) on a bracket
4) on an extension pole
5) on a light stand
6) on a surface - ground, table, floor etc...

Modification: intensity and focus of light
Just like any other light, its strength
and direction can modify and enhance the photograph.
The flash can be pointed directly at the subject, bounced off a surface or modified
by a difuser.
Variables:
There are many variables to consider in creating the best image. Each can affect
the quality of light, the presence of shadows and the relationship between the
foreground subject and the background illumination.
The challenge is to experiment with as many variables as possible to learn
what you can do and how it changes the photograph.
1) Amount of ambient light - daylight, night, dusk, indoor window light,
indoor artificial light
2) Position of the flash- on camera, in photographers hand, on a stand
or holder
3) Power of the flash- The flash power can be altered to fractions of
maximum power.
4) Distance from the subject- the intensity can be changed by the distance
to the subject. (Guide Number)
5) Modification of the light- direct, indirect bounce, filter, difusion
6) Exposure time and f/stop- changing the balance between the ambient
light and the flash is modified by changing shutter speed and aperture
Shoot Portraits, found objects
outside and still-life objects using as many of the variables as possible
Shoot a series of images without flash, and then use off camera flash testing
variables
Be sure to shoot indoors (Interior and closeup) and outside in bright light,
low light and night-time.
After the initial tests,
shoot additional photographs of any subjects - shoot without flash and then
shoot with flash.
Experiment with this new
tool to see what you can do with it. Use the flash in dimly lit environments
as well as in sunny and overcast daylight.
Try shooting with your flash at night- blend it with long shutter speed exposures.
UP
NEXT:
Once you become comfortable with basic off camera flash we will work with
more advanced techniques including multiple flashes and experimenting with
motion |
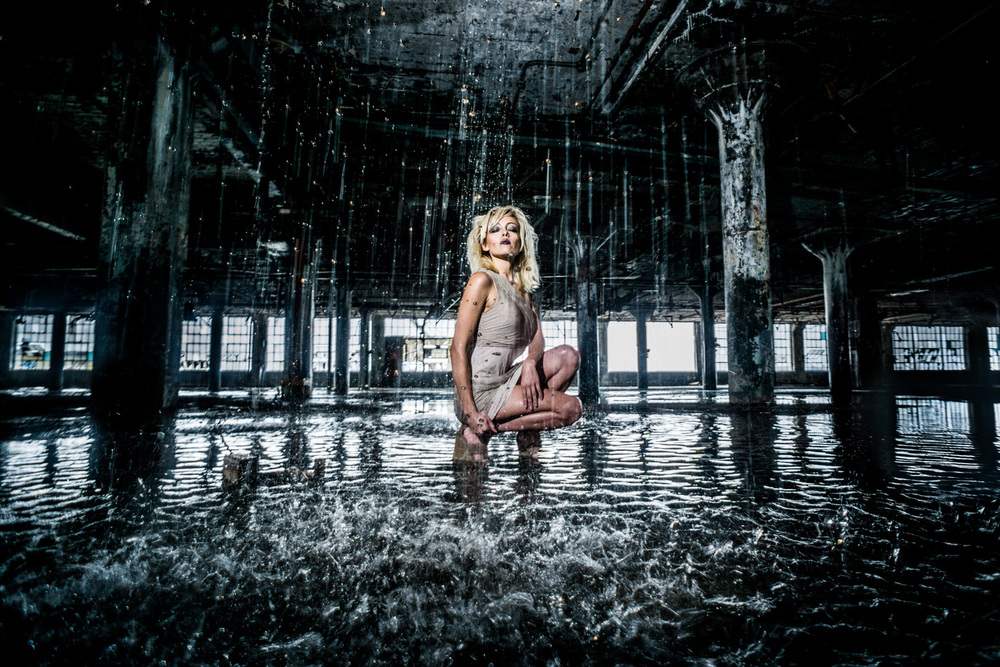
 This image could only be taken
with off camera electronic flash
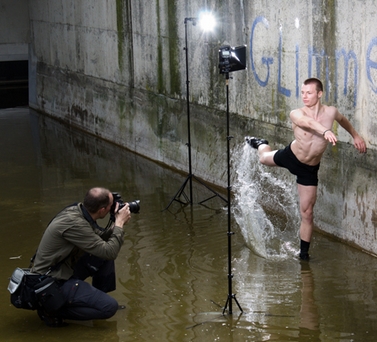
This image could only be taken
with off camera electronic flash