free portfolio website templates
Mobirise

Shooting RAW

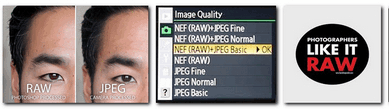
Jpeg and RAW are file formats that digital cameras create when a photo is taken-
Jpg files are universal files that are recognized by most computer platforms and programs.
Jpg files use the exposure, color and other settings on your camera to capture a final image for posting, emailing or printing.
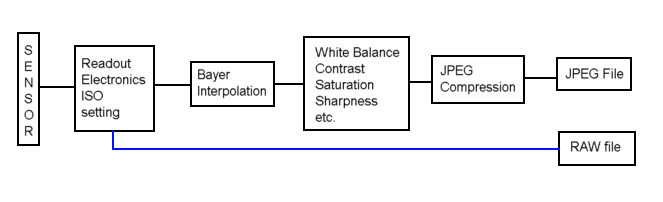
In the camera, a jpeg file is compressed or made smaller to facilitate sharing. Minor image information is discarded when compressed,
Raw files are captured directly from the camera sensor.
This RAW file contains all the information the sensor collected without compressing


Mobirise

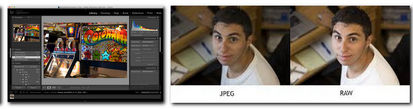
Processing Raw Files

RAW files need to be "processed" by a computer program in order to be shared or printed.
Camera manufactures often provide software to process their particular RAW file format.
Photo editing software such as Photoshop , Lightroom and Corel Paintshop Pro can process most RAW files but have to be updated when camera manufactures change their RAW files.

Mobirise

Reasons to shoot in RAW: 

1. Get the Highest Level of Quality
When you shoot in RAW you record all of the data from the sensor. This gives the highest quality files.
2. Record Greater Levels of Brightness
Levels of brightness are the number of steps from black to white in an image. The more you have, the smoother the transitions of tones.
3. Easily Correct Dramatically Over/Under Exposed Images
RAW has additional information in the file. You can also recover more blown highlights and clipped shadows.
4. Easily Adjust White Balance
When you shoot JPEG the white balance is applied to the image. You can’t just easily choose another option. With RAW the white balance is still recorded, but because you have way more data, it’s easy to adjust.
5. Get Better Detail
When you shoot RAW you have access to sharpening and noise algorithms in programs like Lightroom and Photoshop that are way more powerful than those found in your camera.
6. Enjoy Non-Destructive Editing
Adjustments to a RAW file don't do anything to the original data. You create a set of instructions for how the JPEG or TIFF (another file format) version should be saved.


Mobirise

Downsides to shooting in RAW 

1) Need To Be Processed
Because the files need to be processed, it takes more time to shoot RAW than JPEG.
2) Takes Up More Space
Since RAW files have more uncompressed information they can be 2-3 times larger than JPEG files.
3) Slows The Camera Down
RAW files are larger than JPEGs, so they’ll fill up the buffer of your camera faster.
4) In A Proprietary Format
RAW files are often recorded in a proprietary format, which means that the camera manufacturers haven’t officially disclosed how the raw data can be converted. Companies like Adobe either need to llicense software to decode the RAW files.
5) Obsolence - outdated software and inaccesable files
You can’t be certain that in 5, 10 or 20 years you’ll be able to easily open that RAW file if you don’t have the proper software to decode it!

A new open source RAW format has been developed in order to overcome this obstacle. It was developed by Adobe and is known as DNG (Digital Negative). Using a program like Lightroom, you can convert your proprietary RAW files into the open source DNG format.

Alternative RAW processor (Windows and Linux)

Mobirise

Adobe Photoshop import Workflow 

Use Adobe Bridge just as you would with any photos
Rename your photos (if you shoot RAW+Jpg rename the files the same - keep the file extensio "jpg etc"
RAW File processing workflow:

Convert/Save as DNG File
Correct White Balance
Adjust Exposure - light and Dark
Adjust contrast
Sharpen and Reduce noise
Open and fine edit in Photoshop or Save as TIF file
Save as jpg file for sharing


What is Camera Raw Tutorial
Camera Raw for photo correction Tutorial
Sharpening Details Tutorial
Color Correction - Syncing- Multiple files 

Mobirise

Lightroom Import Workflow - 

Lightroom Catalog: Lightroom requires a catalog folder that is always available relative to your files
A catalog is the structure or database of lightroom.
Your catalog tracks the location of files and remembers information about them.
- Your catalog DOES NOT contain any photos, what it does contain:
- Preview info
- File location
- Metadata
- Develop module settings
- Ratings
- Keywords
- Collections
**If you move photographs outside of the folder you put them into, Lightroom will not be able to locate those files unless you redirect the folder.
Importing Photographs into Lightroom
1. Open Lightroom, select the Library Module
2. Attach camera to computer, insert SD card or jump drive
3. Click 'Import' (lower left corner of screen)
4. Choose 'Copy' (across top of screen)
5. Select which photos to import (those with a check mark in the corner will import)
6. Choose the Destination folder on the right panel of the screen
a. Check 'Into Subfolder' and name the folder
b. Organize: 'Into one folder'
c. Choose folder in which you are going to store your photographs
7. Click Import