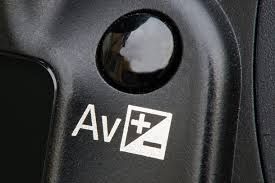
Exposure Compensation
Controlling Exposure- Camera meters and subject brightness
Black, White and Gray are the building blocks of all photographs.
Dark, Light and Middle areas make up images in color and B&W.
Our eyes and the camera capture a scene by processing the light reflected from objects that pass through a lens to the retina or film. Our eyes automatically compensate for variations in lighting, the camera needs to be controlled. Some cameras can work automatically, others need manual adjustment. We use a light meter to determine the proper settings. The camera is designed to work with "average" subjects and sometimes is fooled by subjects that are predominately light or dark.
Subjects don't have to be only Black White and Gray -
they can be other color scenes that are Dark, Light and medium in value.
IN-Class exercise
Control the light with any available light source
This is a simple five frame exercise that can help determine if your camera is working correctly and also demonstrates the way your meter reacts to non average subjects. You must complete this successfully- if it doesn't work the first time - check your camera and repeat the exercise.
Don't have your ISO on auto. Set the ISO Number (sensitivity) to medium high (400). Move in close to the targets to fill the frame with only the appropriate color for each shot.
Use the camera in Aperture Exposure mode (A or AV). Try using your aperture at the largest opening (smallest number) Focus carefully, hold the camera steady to eliminate any camera movement.
1) With first white target, let the camera set the proper exposure.
Compose the frame to include the number 1 and the word Light. Make one exposure.
2) With the black target, let the camera set the proper exposure. It should be different from the white target.
Compose the frame including the number 2 and the word Dark. Make the second exposure.
3) With the gray target, let the camera set the proper exposure. This should be different from the Black & White exposures.
Make your third exposure including the number 3 and the word GRAY.
This is the proper exposure for this light- the "gray card exposure"
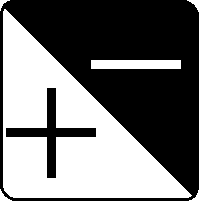
Now you will use "Exposure Value" Compensation
Exposure compensation changes exposure making the image either lighter + or darker -.
For "proper exposure" dark subjects need minus (-) light subjects plus (+)
4) Move to the White #4 target. Use the EV button to add exposure with +2 and expose frame 4 including the word White and the number 4. Your meter should tell you that you are over exposing.
5) Move to the Black #5 target. Use the EV button to exposure with -2 and expose frame 5including the word Black and the number 5. Your meter should tell you that you are under exposing.
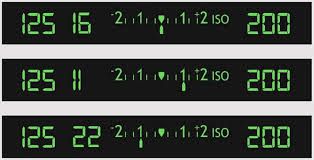
Eyepiece view - Light Meter -Normal, +1, and -1 exposure
The settings change when you add (+) or subtract (-) exposure.
BRACKETED EXPOSURES EXPOSURE COMPENSATION
Use the exposure over-ride control to adjust the exposure for a subject that doesn't average out to gray.
With the camera in automatic exposure mode the exposure is considered NORMAL.
If you have a darker than normal subject, the camera will be fooled into over-exposing it and making it gray.
A lighter than normal subject will be under-exposed making it dull and gray.
To get the proper exposure you use the exposure compensation or EV adjustment on your camera.
Continue the exercise outside class by shooting subjects that are primarily black, white, and gray. Find scenes outside your immediate environment.
Shoot under a variety of light (see examples on website) and bracket your exposures just as you did here. We will analyze and choose the best results in class.